Pages

Showing posts with label Ribbon. Show all posts

Monday, May 12, 2014

Three Babies In One Week

Good morning cyber friends!  Have you noticed that your friend's adult children are now having babies? How old does that make us??? We have just heard of 3 sweet bundles of joy arriving this past week.  I did find a baby boy card in my stash.  Yippee!  Looks like I will be doing a CAS card for the remaining 2 baby girls cards.  Here is what I came up with:


I started out by using two coordinating double sided designer papers, one with polka dots and one with wavy lines.  The wavy paper is 4-1/4 X 5-1/2.  Dotted paper was cut 4-1/4 X 7, then scored at 5-1/2, folded over and taped onto the dotted one.    Both paper edges were inked with coordinating ink color.  I found this adorable ribbon in my stash and added it to the top using glue dots.  Perfect little girl vibe going on so far.  Side note:  the card was supposed to be PINK, but the paper is really more peachy in color.  I guess that works for little girls, too?


Next, die cut a scallop circle from the DP and ink the edges.  This sweet little bird delivering the sparkly bundle is from a Unity mini set called "Birdie Told Me".  She was stamped on white paper, die cut, colored and glittered with stickles.  I also added stickles to the outside edge of the circle.  The sentiment on the front is from an older Stampin Up set.


The sentiment on the inside is a from a clear stamp set by Cloud 9 Design called Simple Thoughts-Baby.  I just added the little silver charm using a brad before adhering the layer to the card base.

This card only took about 30 minutes to make and the hardest part was waiting for the stickles to dry!  
I am happy that I was able to get all three cards out in the mail today.  Feels good to get something accomplished.

Well, I had intentions of submitting this card to some challenges, but alas there just wasn't enough time.  Maybe the next one.


Have a wonderful day and thank you for taking the time to stop by!
Cheesy Sandy


Tuesday, April 29, 2014

Iris Folding Technique

     Iris fold is a technique that I came upon awhile ago.  I took a class at a local stamp store and became intrigued.  Next I went online and eventually found  Circle of Crafters,   There are many FREE patterns on this site as well as directions on how to create an iris fold .
     I have a friend who loves anything to do with water.  She even named her first son after a TV show character from the show, "Flipper".  (If you remember that show, you are showing your age!!!)  Sooo, I figure a dolphin card!  Here is the first try with the free dolphin pattern downloaded from Circle of Crafters.  Trace it onto paper and cut out by hand.   I liked this crinkle turquoise paper for the cut out layer and then chose 2 different blues for the iris folding.  Next it is layered on a corrugated paper that somewhat reminded me of waves.  
Blue paper dolphin
     Next I used the same crinkle paper to cut out the dolphin, but placed it at a different angle on the paper.  Then I chose a thin (text weight) silver paper for the iris folding.  I do like how this dolphin looks although it does not showcase the iris folding as much as the first one above.
Silver dolphin
     Well, I liked the dolphin in silver, but wanting the iris fold to show up more, I used 3 different silver papers.  If you click on the picture, you will see the different papers.  One paper is a tissue paper (very thin and a little difficult to work with), one is textured and much thicker (also hard to work with), and then a metallic cardstock.  What do you think?
Three silvers dolphin
     So now I want to experiment with a different paper to cut out the dolphin shape, and I chose a water printed paper which I think is from Michael's or JoAnn's.  I came up with another paper in my stash.....a white on white striped text weight paper (it shows up looking silver here, but click on the picture and it should look more white).  Sorry, but I do not remember where this paper is from.  This dolphin may be my favorite!  And this is the one I eventually sent to my friend.
White striped dolphin on water-print paper
     One more try, keeping the same water paper base, but now changing up the iris fold papers.  Most of the iris fold patterns I've seen usually use 3 or 4 different colors/patterns of papers, so here is my dolphin done that way. 
Multi-color dolphin
     Lastly, the center of your iris fold will usually have a small space.  Many times I've seen a small piece of holographic paper placed there.  I love hearts and thought it was neat to place a heart brad there for some of my dolphins.

     Well I also needed to send a baby card to my son's childhood friend and kept going with iris folds.  Looking at the Circle of Crafts site, I found the baby carriage.  She was having a girl, hence the pink carriage.  She thought it was a really unique card. 
Pink iris fold baby carriage
     Did you notice that I used ribbon instead of folded papers for the iris parts?  I really like using the ribbons......it is faster for sure.  Hope you give iris folding a try.

See you again soon!
Cheesy Sandy
Monday, June 10, 2013

SYMPATHY IN BLACK AND WHITE


What are the hardest cards to make?  In my opinion, it is a sympathy card.  Having to make a few recently,I think it is even harder when you do NOT want it to have any religious tones.  Went looking for some appropriate paper Black and White)and found some Black and Silver that I thought would work at a local big box store. 

I came across the Card Crafter's Circle challenge blog and they are having a sketch challenge similar to what I had in mind....


 and thus the card materialized:

Finished size is 5 X 7

My old standby for a sympathy card uses a die cut bird that I call a dove, however I don't have one laying around and no die cut machine, so I found these dove brads and some floral embellishments that look like lilies to me.  Also looking in the dollar bins, I found some great black and white ribbons to add.

Dollar bin finds


The ribbon is sheer and I think really beautiful. It is adhered to a piece of white cardstock and layered onto black.
 

Here it is just added to the inside of the card directly onto the white cardstock.
Heartfelt Creations sentiment


The brads were plain white, so a little glue was added to the wings along with some white art glitter.


While I was at it, I made a few more in A2 size.  One for a birthday and 2 more to have on hand.  I also made one into a thank you (not pictured).  I apologize for the quality of the picture--it was at night.


ABC Challenge - O for Open
Card Crafter's Circle - Challenge #78 Feeling Sketchy
Crafty Sentiments Designs - Black, white and one other color (silver)
Sentimental Sundays - Challenge #158 Metal Findings (doves)
Creative Moments - Challenge #18 Lots of Layers
The Hobby House - Challenge #1 Anything Goes
Make It Monday - MIM #144b with Nicecrane Designs (b) - Anything Goes

That's it for now.  I am a little behind getting this posted.  Worked all day in the yard yesterday and my body is really feeling it.  My hands are so stiff it is hard to type!  LOL.  Until the next time.........happy stamping!
Cheesy Sandy  

Friday, June 7, 2013

LEFTOVERS

Hello Bloggers,

As I told you last time, I do not have many supplies with me this summer so I brought some "leftovers" with me to use up.  Here is another card using some leftover pieces:
Toni's birthday
 
I had some glossy cardstock that was dry embossed with an embossing folder.  I used a brayer to roll ink from the Kaleidacolor rainbow ink pad called Spectrum.  Love this look which I learned from my former design teammate, Shona.  Cut to desired size and layered it on white paper.  After that it was simple!  I added the white ribbon with a thinner apple green ribbon to the middle, plus 3 half pearls.

The flowers??  Those are dollar store sticker finds!!!   (Thanks to my Florida friend, Gloria.) Yep, they are dimensional and really pretty.    And you get quite a few for $1.  What do you think????


Added a couple of the smaller stickers to the inside sentiment (Heartfelt Creations).  The writing uses a Sakura Glaze pen (these give a pretty color and sheen along with a little dimension).  Will probably be using these more this summer since I am without most of my stamps.  LOL.


Hope that this has given you some ideas!

Entering this card into the following challenges:

Challenges4Everybody - Challenge 21 - Anything Goes
Make My Monday - Use lace and/or ribbon
Inspire me Friday 106 - Anything Goes
Creative Moments - Challenge 18 - Lots of layers
Totally Gorjuss - Challenge 186 - Anything goes with flowers
TTCRD - June 4 - 10 Challenge - Anything Goes

See you next time.  It has stopped raining, so I am going to try to go and plant some of my own flowers to enjoy.

Cheesy Sandy

Tuesday, February 21, 2012

The Look of Old Time Photos (Reverse Soot Stamping)

I am really fascinated with the Soot Stamping techniques.  My favorite so far is the Reverse Soot technique.  I used a stamp from Impression Obsession called Lottie Collage for these two cards.  Isn't she beautiful?  I recently purchased this stamp used at a stamping garage sale.

This first card was for a swap in my Florida Stampers online group: 
Reverse Soot Stamping - Lottie

To do reverse soot stamping, you first stamp the image using Versamark ink onto glossy cardstock.  I use a piece larger than needed for the card.  Then you hold the paper with the stamped image toward the flame of a candle moving the paper around until soot begins to build up on the surface of the paper.  Be sure to keep moving the paper so that it does not catch on fire.  Tip--the edges catch on fire quickly.  So far every time I've done this, the edge has caught on fire...so be prepared!  And the soot will rub off if you touch it so you also have to be careful when putting out your burning paper.  After you have all the soot you want, take a tissue and wipe off the excess.  The soot remains on the stamped image, and there will be a little left on the rest of the paper too.  You need to spray this with a matte Final Fixative so it doesn't rub off (you can use hairspray, but I was afraid it would yellow after awhile).  I purposefully caught these edges on fire to give it an old, worn look.  I used a little Antique Linen Distress Ink on the lace so it would look older, layered it onto a dark brown ruffled ribbon and also put a tiny beige ribbon on top.  Added some real dried/pressed flowers at the top that I had in my stash and the saying at the bottom is from Inkadinkado.

The second card is the same image done in the same way:

Lottie in Purple - Reverse Soot Stamping
 I sent this card to a friend (oh, she is the person I bought this stamp from).  She is a good buddy and I haven't been sending cards out "just because" lately.  The image this time looks a little more worn because you can see that it got a slight bit more burned in one area.  I added some purple mulberry paper behind the soot image.  Just add some water to where you want to rip the paper and it will pull apart easily leaving fibers showing at the edge.  I inked the edges here because this paper had white showing after I ripped (first time for that).  Added the fun ruffled purple and black ribbon with  a pale lavender piping glued on top.  The flowers were beige Prima wildflowers that I colored with Milled Lavender and Dusty Concord Distress Inks and put small half pearls in the centers.

I love how the same image looks so totally different depending upon the card arrangement!
Hope that you will try sooting!   Send me a picture (ilchezhead@yahoo.com) and I will post it here, and/or I can link back to your blog also.

Happy Sooting!
Sandy (Cheesy)

Monday, November 28, 2011

A Birthday Card on the Masculine Side

Hello everyone,
Its been awhile and I am sure you have been as busy as I have.  Now that Thanksgiving is over, all we have to look forward to is the Christmas rush.  LOL. 

Well, I had a birthday card to make for my son who just came into town from Canada.  We were lucky enough to see him and his family for a few days this weekend.  What fun!  So I am sharing the card I made for him.  Its not that complicated, as I didn't have lots of time to fuss.  But then guy cards always seem to be more simple.  At least to me.

The card was made with black and gold cardstock.  The main design was done with a cuttlebug embossing folder and then I ran black ink over the top to pop out the design.  I cut out the saying with a Spellbinders tag die and heat embossed the saying with black embossing powder.  Added a ribbon and it was done.  I liked the look of it and so did he.  Simple yet elegant.

I am entering this card into the following challenges
    More Than Favors-Wacky Wednesday #60-Birthday Theme
    Speedy the Cat's Friends Challenge #83-Make It Masculine
    Rainbow Lady's Challenge #180-Cards for Men
    Here Come the Boys Challenge #19-For the Man/Men In Your Life
    Whimsical Designs Wednesday Challenge - Add Texture

Happy Stamping,
Sandy (Cheesy)

Thursday, November 10, 2011

It's A Cultural Thing Blog Hop presented by Sparkle and Sprinkle

Welcome!  Yokoso!  Bienvenidos!  DzieÅ„ dobry!  Benvenuti!  Welkom!  Karibu!  Välkommen!...........

We at SNS are celebrating America’s richness of customs and culture in a blog hop!  If you happened here by chance, and not from the blog of the talented Patti White, then you might want to go over to the Sparkle and Sprinkle Blog to start from the beginning and get all the details about what to do and how to be eligible for all the wonderful prizes.  Otherwise, let's continue our journey..........  

Remember in school we learned that America is the "melting pot"?  And that is so true!  We all know our ethnic backgrounds and hopefully cherish their traditions.  When my family moved to a neighborhood that had many Jewish residents, we all learned of that rich faith and their traditions.  My eldest's son's best friend in grammar school was a blend of Irish and Japanese.  I chose a stamp set with his family in mind:  Asian-Umbrella Geisha #300.  Here is the card:

Umbrella Geisha

I decided to make a center step card (finished size of this one is 5.5 X 5.5).  Red and black and gold seemed to say Asian to me.  Stamped the willow branch in versamark and embossed with clear embossing powder for a background, then embossed the Geisha in black detail embossing powder and cut out.  Added a beautiful cord/ribbon in black.  It needed a little detail, so I made the little square Japanese symbols for the bottom corners.  You can go here to see the complete directions to make this card.

After you leave a comment here to be eligible for prizes, stroll on over to Dawn's fabulous blog to continue on your journey around the world with us.  Winners will be announced Saturday, November 12 between 11AM-3PM (Pacific Time) on the SNS blog.

By the way, this is my last blog hop with the Sparkle team, as I will no longer be a full time designer.  I will, however, be a guest designer on ocassion.  Please stop by to see what is going on in my part of the world when you can.  I am planning to give away some free blog candy each month.  Until then, as my card says,  I'll be "Thinking of You"!  Thanks for all your support in the past.

A reminder that through the end of the month, the Sparkle Team presents Design Elements, Asian, Medallions and Andrea Roberts stamps on special - 15% off! To view all our specials, including stamps, glitters, EPs, and other fine SNS products, just click here.

HOW TO LEAVE A COMMENT: Are you new to blog hops? To find the comments section, scroll down to the bottom of this post. After the posted by Sandy, you will see the word COMMENTS.  Click on the word COMMENTS. A box will pop up (or you may have to scroll down again). Write your comment (sign your name if leaving an anonymous comment). Perhaps one of those wonky SPAM preventer options will show up. Just type in the shown characters and click enter. That’s all there is to it.  Hope this helps.

Many Thanks
Cheesy Sandy

Tuesday, May 10, 2011

"Not So Macho Masculine Card" Blog Hop

Welcome to the Sparkle N Sprinkle "Not So Macho Masculine Card" Blog Hop! You are in the right spot if you arrived here via the amazing Patti White's Blog.  If you'd like to start from the beginning and become eligible for great prizes, then click here (that's where you'll find all the directions you need to hop along). 

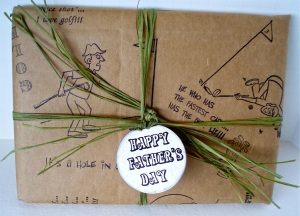
As I thought about what I'd like to do for this masculine blog hop and the golfers stamp sets I was using, I thought about my two sons and husband and how they would give their presents - - usually still in the bag they brought it home from the store in.  As the boys got older, we started using old newspapers and paper bags to "wrap" the gifts because it "looked my masculine".  Thus, my first creation:  brown paper bag gift wrap!!  LOL

[caption id="attachment_351" align="aligncenter" width="300" caption="Paper Bag Gift Wrap"][/caption]

It's really simple:  just cut open a brown paper bag and stamp to your heart's content.  Add some raffia "ribbon" and a tag.  To make the gift tag, simply fold a piece of glossy cardstock in half, place it in a Spellbinders circle die leaving the fold outside of the cutting circle.  The result should be a mini circle card.  Then stamp and emboss the words in black detail embossing powder on the front of the card/tag.  Run the front thru a die cut machine using the Cuttlebug Swiss Dots embossing folder 37-1604 (but put the paper in so the back is facing back--this will "de-boss" the image).  Viola!  A golf ball gift tag for the present.  Here's a close up to see it better.

[caption id="attachment_353" align="aligncenter" width="300" caption="'Golf Ball Gift Tag"][/caption]


Then I made a card to go along with it.  First die cut 4 small circles for golf balls and emboss the letters G,O,L and F from stamp #549-255MS on them before putting them thru the embossing folder.  (Hint:  ink stamp and then put scotch tape over the part you do not want to show).  Remove protective cover from 1/2 of sticker paper, lay ribbon and the golf balls onto sticker paper.  (Hint:  work on half of the sticker paper).  Apply Palm Green Flock (FL115).   Make a larger golf ball.  Stamp Father's Day #563-255B as above, remove paper from sticker paper.  Lay down golf ball and words, then apply flock.  Stamp Joe Cool #214-255G, colored him and cut him out.  Pop dot him on top of the golf ball.

[caption id="attachment_359" align="aligncenter" width="298" caption="Father's Day Golf Card"][/caption]

You can see the detailed directions for this card here.

I used two SNS sets for my projects:  Golf-McDuff #255 and Golf-Live Laugh Golf Set #192

We get to donate one product towards the grand prize! and I chose the Palm Green Flock (FL115) which was used on my card. I love to add texture to cards and flocking is a great way to do that. I am so excited to give you a sneak peek of this product as it is not yet for sale, so whoever wins will have this flock before anyone else!  Isn't that exciting?   

[caption id="attachment_342" align="alignleft" width="130" caption="Palm Green Flock FL115"][/caption]


Don't forget to leave a comment to become eligible for the prizes, then hop on over to Julie's blog to see her phenomenal creations.

Thanks for hop, hop, hopping by - - and I hope you enjoy the really amazing cards along the rest of the trail.

Sandy

Wednesday, February 23, 2011

Lacy Ladies Class at SNS

Morning!!

The ladies that joined me at Sparkle N Sprinkle for the glitter lace technique class were so friendly and nice.  And they ALL loved the cards we made and this technique.  I am looking forward to seeing them all again at another class.

Here are the cards we made:

[caption id="" align="aligncenter" width="640" caption="Glitter Lace Ladies Class"][/caption]

These will make great Mother's Day, Birthday, Friend or Thinking of You cards.  When a card is needed, just add the greeting on the inside.

You can view the technique directions on the SNS website hereImages and glitters are all Sparkle and Sprinkle.

I got to Skype with one of my sons and 2 grandsons last night.  Love seeing them and talking to them (yes, I miss them!).  What a great invention!  Glad I live in today's world.  LOL

Hope you enjoy your day.  We finally have weather that is Florida-like.  It was 80 yesterday!!

Sandy
Saturday, February 12, 2011

Really Reasonable Ribbon and Sparkle N Sprinkle Blog Hop


Welcome! Hopefully you arrived here for the Sparkle N Sprinkle and Really Reasonable Ribbon (RRR) Blog Hop from Patti's Place and have been enjoying all the eye candy the designers have posted. If you did not arrive here via Patti's blog, you probably should head over to the Really Reasonable Ribbon Blog to get started and not miss any of the action.
I am Sandy, one of the Sparkle and Sprinkle designers, and I am delighted to be working with RRR on this blog hop. In addition to the Really Reasonable blog candy, Sparkle N Sprinkle is giving away a stamp set to one lucky blogger! Leaving a comment on every blog increases your chances of winning, because no one knows which of the artists' site has been chosen to house the prize.

On Thuesday, February 15, a name will be drawn from the comments on the mystery artists' blog. Winner gets to choose a stamp set of their choice from SparkleNSprinkle.com!
On to my creation.....I started with 2 of the ribbons from the RRR February Ribbon Kit (which has some wonderful Spring-flavored ribbons) and weaved them like a basket onto a piece of cardstock. Next, die cut the Spellbinders Label Four die from blue cardsdtock. Then trace the outside of the same die onto pink cardstock and cut out, then emboss with the Swiss Dot embossing folder .  Layer these over the weaved ribbon piece as above.


Next I stamped the large Rose 3 times from Sparkle N Sprinkle's Stamp Set #402, My Rose Garden. Color them, cut them out in various layers and pop dot them together. Under the rose first is a piece of white cotton lace trim from RRR that I colored using a dye ink pad, then a Spellbinders tag that was cut out 5 times. I used only the fancy ends of the tags, applied Brushable Glue #540 and Sparkling Snow Glitter #G1003.  I left the sentiment off so it could be added later as needed. Hope that you enjoy the card and have had a great time hopping along with us.
Next stop is the Really Wonderful Erika's blog.  Happy Spring!!!
P.S. Don't forget to leave your comments along the way.....

Thanks for stopping by,

Sandy

Sunday, October 17, 2010

SNS Blog Hop

Sparkle and Sprinkle's Fall Blog Hop! 

Welcome and I'm happy you are visiting.

If you happened here by way of Julie Warner's blog, then you are in the right place.  However, if you arrived here from somewhere else, you might want to start from the beginning, at the SNS blog, so as not to miss anyone's remarkable cards!  At least one prize is involved, and the more visitors we have, the more prizes will be awarded - - - so tell your friends!  To become eleigible for a prize just:  Leave a comment at each designer's blog about her card AND who you think has the Hidden Birthday Prizes. 

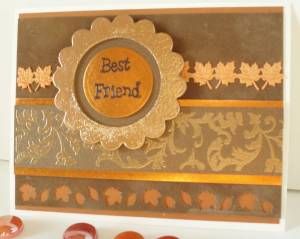
This is the card I've made for you.  It is a repurposed SNS stamp done in a fall theme.  I used the Brocade Backgrounds set to make a friend card.

Fall Inspiration using SNS stamp #3129-398H

The card base is burnt orange cardstock.  Next layer is brown suede paper that has leaves punched on the bottom.   Next is the beautiful swirl stamp embossed with Butterscotch EP 115 embossing powder which is mounted onto a copper metallic strip.
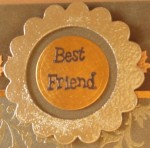
Close up of scallop circle
The scallop circle is a pre-cut piece of tagboard that was embossed using SNS Butterscotch embossing powder.  The words are SNS #187-354AA which are embossed with Teddy Brown EP187.  The piece was attached with pop dots.  I finished the card by adding cut leaf ribbon.  Does this card make you feel like autumn?


Thanks for visiting and I hope you've been inspired.  The next stop on the hop is the wonderfully talented Donna Ellis.  To visit her lovely creations, click Here.  But before you go..................................