Pages

Showing posts with label Sparkle and Sprinkle. Show all posts

Friday, February 1, 2019

Sadly a Sympathy Card

Sympathy cards are probably the hardest to create, because it is not something that we want to make.  A long time friend's spouse recently passed away and I am not able to attend the services.  I remembered creating a background with a Sparkle and Sprinkle stamp way back when I was on their design team, so I got the stamp out and made this card.


First stamp the image on gray CS six times with Versamark and emboss with Black Detail embossing powder.  Stamp them one at a time to make it easier to line them up.  Punch the edge with punch.  Layer onto black card base.  Die cut the bird two times, once in black and once in white.  Use Dimensional Glue over detail cut lines and apply Sparkling Snow glitter.  Pop the bird onto front.  Stamp the sentiment and emboss with Black Detail embossing powder.  Cut into a rectangle; layer onto black rectangle.

Inside

The inside only has the same punch along the edge and the sentiment stamped.  I really like this sentiment from Stampin Up.


Sympathy

Another card was needed for a different family member and I did not want to send the same card.  I punched the edge of the white card base, punched a piece of black CS and layered them. A piece of pattern paper was added to the top. Used the same bird die as above and a different SU sentiment.

Really hoping that you do not need a sympathy card but if you do, perhaps one of these will help.


Thank you for stopping by.
Sandy


Friday, May 8, 2015

TEA PARTY

I just had a tea party at my house.  It was my second year hosting the Spring Easter tea for my tea group, and I thought it would be fun to invite YOU, my blogger friends, via the internet to share all the fun (vicariously).  I will start off with the invitation.

2015 Tea Invitation

I had lots of ideas, but as always, I started to run short on time, so I opted for a more simple design.  It is a gate fold card on peach CS with a beautiful designer paper layered on top.  I die cut this Poppystamp Die Teapot Stack 1157 from a teal cardstock.  Then I cut it again from silver cardstock.  When I removed it from the die machine, I turned it upside down and put a piece of removable tape across all the pieces; then carefully removed the outline of the die (save this piece for a later project). Now take the teal outline and place a piece of tape on the back of it covering all the cutout areas; pick up each silver piece and place it in the proper space in the teal outline.  Yes, I know....you are saying this will take time.  But BELIEVE me, if you don't keep all the pieces in the proper place, you will have a nightmare on your hands trying to figure out which piece goes where!  Just ask me how I know! 
Now all you have to do is tape the teapots to the left side and add corner sticker embellishments!

2015 Tea Invite Open


On the inside I stamped a Sparkle N Sprinkle stamp and left it in black outline.  I added a hand written reminder to wear a Easter bonnet.  The center is a Martha Stewart punch around the page with the information needed pre-printed from the computer.

Unfortunately, this stamp may no longer be offered, but Sparkle and Sprinkle does have other Hat Ladies that would work (also offered as digi stamps):

Vivian Hat Lady and Danielle Hat Lady and Catherine Hat Lady

Stay tuned for more information on the tea, like the menu and recipes.

I would like to enter my card into the following challenges
Scrapy Land Challenge #17 Anything Goes  (include dies they carry) 5/17
Lil Patch of Crafty FriendsChallenge #9 Anything Goes 5/15


See you soon!

Tuesday, June 25, 2013

2nd Birthday Cupcake

Good Morning Cyber Friends,
Today's card is the one I made for my only granddaughter, so I HAD to do it in pinks.....its my one chance to do girly!  I decided back in Florida some of the details and punched out a Martha Stewart butterflies edge punch from glossy white paper.  Also decided that I wanted to make an easel card.  Then a friend from my online stamping group was showing us how to use peel off stickers on sticker paper and she had an extra sheet of cupcakes......perfect.  Brought all of it here and this is the result.
Card closed

Found some cute pink flowered paper at Michael's and layered it onto pink card stock, then used a corner rounder punch.  Inked the edges of both papers.   The "happy birthday" is from a different sticker pack which is placed on a strip of pink with inked edges.  Two small punched butterflies with little jewels for bodies were added.


Above is the Happy Birthday sticker from Stampendous called Class A' Peel.


Glittery Cupcake CloseUp
The best part of any birthday party is the cake, right?  This one is yummy looking with all of its glittery goodness.  The black outline sticker was put onto 2-1/2 inch double sided Terr-ific Tape from Sparkle N Sprinkle (SNS).  Next, pour on the Cloud Nine Velvet Glitter, rub it in and shake off the excess.  Now use your Copic markers to color it in over the glitter.  SNS has a tutorial on its website showing how to do this Velvet Glitter technique here.  This cupcake only had one candle, but my granddaughter was two, so I added another from the sticker page before glittering.  When done coloring, remove the other protective layer from the tape and apply to some heavier weight paper; then cut around edges.  I used another one of those action wobble springs to attach the cupcake to the front of the card (see my  last post for the Car Card).  Isn't it shiny??


This is the cupcake sticker from Elisabeth Craft.  The "white" one is what was left after I removed the actual sticker.  You can see one candle sticker on the lower right that I also used.  There are 4 more cupcakes here to use, plus another one that is missing (I have glittered it and it is ready to use), so you get 6 cupcakes on one sheet.  Can you see that there are some smaller stickers that can be used as well?


Easel Card Open
Here is the card open.  The butterfly was used to hold the card open. A Sakura glaze pen was used to write the sentiment on the banner, and the area that cannot be seen here is for signing.  

Popped Up Butterfly

Here is a close up of the butterfly.  The punched out butterfly was glued onto a piece of acetate, cut out and then glitter was added with glue.
I was really happy with how it turned out and since she is only two, she will probably just love the wiggly cupcake, but her mom saves all of my cards, so maybe one day she will look at it and think of me!

I will be entering my card into the following challenges:
Catered CropPunches and dies
Hobby Cutz - Challenge 9 - anything with H (Happy Birthday)
ABC Challenge - P for Pretty In Pink
ALBC - Something Sweet (cupcake)
Animal Friends - Butterfly or Bugs (butterflies)

Hope you have a wonderful day and thank you so much for spending some time with me.
Cheesy Sandy


Monday, May 7, 2012

Embossing X 2 Class

Wednesday, May 9th (10:30 am - 1:30 pm) at Scraporium is the next class.  I am calling it "Embossing X 2", since we will be using Embossing Folders and Embossing Powders.  One of the cards is definitely masculine and the music themed one could also be for a guy.  If you aren't loving some of the sayings I used, I usually bring one or two others......but you could always leave that part blank and add words when you need it.  These are really versatile cards.  Call Denise at the store (813) 269-7946 to sign up.


Sandy (Cheesy)

Wednesday, February 29, 2012

Bunny Hop Card Class

Hi stamping friends,
Just wanted to give you a heads up on my next card class being held at Scraporium in Lutz, Florida.  It will feature Easter Cards with Sparkle N Sprinkle stamps.  Of course, they do not have to be for Easter....you could use them for lots of other ocassions, like birthdays or get well or thinking of you.  Just leave off the holiday wording or add your own words.  Here's the low down:

Date:  Wed, March 14
Time: 10:30 - 1:30
Cost: $20


Bunny Hop Card Class
Be sure to call Denise at the store to sign up in advance.  Looking forward to seeing you then!
Cheesy Sandy

Saturday, February 25, 2012

MORE SOOT STAMPING

Hi Stamping Friends,
Just got finished teaching the Smokin Hot Card Class using soot stamping techniques.  I have shown you two cards previously (see Feb. 19  post below) which were masculine cards done with soot and reverse soot stamping using the Sparkle N Sprinkle Stamp Set #285 - 1900 Cars.  So I thought I'd show you the other two cards we made. 

First is color soot stamping.  For this technique you first apply water based inks to the glossy cardstock and let dry.  Then proceed as usual with sooting and stamping.  Here is the card we did using this technique:
SNS Set #316  Elements
This is a tent topper card.  I used Petite Scallop Circle Large S4-115 to cut out the sooted image of Floral butterfly circle from Stamp Set #316.  This was the class' favorite card, even though many of them came to class specifically for the masculine car cards.  LOL.

Next, we did soot stamping onto precolored glossy cardstock.  Glossy cardstock comes in many different colors, but I chose a yellowish gold thinking it would show up better with the soot.

SNS Set #160 Butterflies
This is a gate fold card with a "belt" closure around the center.  We used one butterfly stamp from the Sparkle N Sprinkle Set #160 Butterflies.

So I hope this has given you some inspiration!  I am having company coming and going for the next 2.5 weeks, so not sure how often I will get to post.  I will try to get something up at least once a week, so check on back.  See you soon!

Thursday, February 23, 2012

Cupcakes for Birthdays

Don't you just love punches?  I know I do.  I recently added EK Success's Cupcake Chain Large Border Punch #54-50023 and wanted to use it.  on't you just love border


EK #54-50023
Cute, isn't it?  Since I have a number of neices and nephews, I decided to create a card that I could make several of and keep onhand.  Here's what I came up with:

3 Cupcake Birthday Cards
 I started by punching out the border in white cardstock, traced the bottom of the cutout along the front edge of the card and cut out.  Sponge a color of ink onto the cupcake wrapper and glue to the card.  Take some dimensional glue (I used Sparkle N Sprinkle #539) and then sprinkle on your desired outcome.  I used Sparkling Snow Glitter G1003 on the light pink card.  Since it is semi-transparent, some of the cardstock color shows thru.  On the dark blue card, I used Bridal Glitter G1029 which is opaque so the cs color doesn't come thru.  On the purple card, I used the Sparkling Snow, but added multi-colored holeless beads (they are really tiny) to make it look like sprinkles on the icing.  Since I made 7 cards, I really played around with different topping looks and I even did one that looked like chocolate frosting by adding Chocolate Sparkle EP127 embossing powder onto the glue (NO, you do not heat it.  Use it just like it was a glitter).  Sorry, but I already mailed that one out without taking a picture.

The words were from a piece of laser cut paper I bought at the local big box store.


I just cut out the words I wanted, coated with Versafine ink and embossed with different embossing powders.  Run it thru the Xyron machine and you have instant sticker words!  On the purple card, I used Dragon Fruit EP410 to emboss the words.  It has a kind of speckled appearance which went so nicely with the cupcake topping. LOL

Inside is some fun paper stamped with a cupcake that is colored with added "frosting" on top.  Each card has different papers inside. 

Think the kids will like them?  I hope so.  Try making one.....its not very hard.

Since I need a couple of cards that will go to some children that are a little older and live at the same house as those getting these cards, I am about to make a different cupcake card.  Stay tuned............

Have a great day today

Sunday, February 19, 2012

Smokin' Hot Card Class

Have you ever done SOOT stamping?  There are a few different ways to do it and I've been having fun with it.  I will be teaching a class on it at Scraporium in Lutz, Florida this Thursday, Feb 23 from 10:30 to 1:30. 

Here are two samples using one of the great classic cars from the Sparkle N Sprinkle Set #285 - 1900 Cars:

Soot Stamping

Reverse Soot Stamping
We will be making 3 - 4 cards and the other two will be more feminine for a little variety.  Give Denise a call at the store to sign up at 813-269-7946.  Hope to see you at the Smokin Hot Card Class , even if you are NOT a pyro!  LOL!

Sandy (Cheesy)

Monday, November 14, 2011

Water Lily Birthday Card for a Challenge

I have been wanting to try some challenges from other sites for quite awhile, but usually have been too busy to even think about it.  So here is my first attempt.  This is a card that uses glitter and a beautiful cardstock to get lots of Bling! 

Water Lily Birthday Card


All stamps, glitters and embossing powders by Sparkle and Sprinkle.  Start by stamping the Water Lily 1236-234M and emboss using Silver Detail Embossing Powder EP257, then color with copic markers.  Use versamarker on the flowers then apply Sparkle Embossing Powder EP107.  Stamp Happy Birthday 1237-234A in blue ink (cover the "to you" with tape).  Next cut out the image using Spellbinders Labels Four Die S4-190 (largest), leave the die on the paper and shade with pink ink.  Add Silver Leaf Tinsel Glitter GT3004 with glue to the center of the one flower.  Use the same die and trace around the outside and cut out of turquoise paper.  Die cut the Sissix Corner Flower #2 die from Sticker paper. Remove backing and sprinkle Bubblegum Glitter G1088 over. Attach to corner as in picture
Die cut the bottom butterfly from white cardstock and the top butterfly from vellum. Leave the paper in the die and color the spots with pink Copic marker on the white paper, and use Gelly Roll Pink Star pen of the vellum. Use a Sakura glue pen on the spots on the white paper, then sprinkle with Sparkling Snow
glitter G1003. On the vellum, brush the entire butterfly with brushable glue, sprinkle on Sparkling Snow glitter. **the paper will curl—after dry bend it back into shape. When dry, attach vellum butterfly layer onto white layer using 1/8” Tear-ific Tape.
The pretty blue background was made using Cadillac Embossed Cover that you can buy here.  It is beautiful all by itself in white, but I simply added some blue dye inks with daubers until I got the color I wanted.  Simple and shiny.

I am entering this into the following challenge:
Party Time Tuesdays #41, bling it on:  http://partytimetuesdays.blogspot.com/2011/11/ptt41-bling-it-on-anything-sparkly.html

Thank you as always for stopping by to visit.
Sandy (Cheesy)

Thursday, November 10, 2011

It's A Cultural Thing Blog Hop presented by Sparkle and Sprinkle

Welcome!  Yokoso!  Bienvenidos!  DzieÅ„ dobry!  Benvenuti!  Welkom!  Karibu!  Välkommen!...........

We at SNS are celebrating America’s richness of customs and culture in a blog hop!  If you happened here by chance, and not from the blog of the talented Patti White, then you might want to go over to the Sparkle and Sprinkle Blog to start from the beginning and get all the details about what to do and how to be eligible for all the wonderful prizes.  Otherwise, let's continue our journey..........  

Remember in school we learned that America is the "melting pot"?  And that is so true!  We all know our ethnic backgrounds and hopefully cherish their traditions.  When my family moved to a neighborhood that had many Jewish residents, we all learned of that rich faith and their traditions.  My eldest's son's best friend in grammar school was a blend of Irish and Japanese.  I chose a stamp set with his family in mind:  Asian-Umbrella Geisha #300.  Here is the card:

Umbrella Geisha

I decided to make a center step card (finished size of this one is 5.5 X 5.5).  Red and black and gold seemed to say Asian to me.  Stamped the willow branch in versamark and embossed with clear embossing powder for a background, then embossed the Geisha in black detail embossing powder and cut out.  Added a beautiful cord/ribbon in black.  It needed a little detail, so I made the little square Japanese symbols for the bottom corners.  You can go here to see the complete directions to make this card.

After you leave a comment here to be eligible for prizes, stroll on over to Dawn's fabulous blog to continue on your journey around the world with us.  Winners will be announced Saturday, November 12 between 11AM-3PM (Pacific Time) on the SNS blog.

By the way, this is my last blog hop with the Sparkle team, as I will no longer be a full time designer.  I will, however, be a guest designer on ocassion.  Please stop by to see what is going on in my part of the world when you can.  I am planning to give away some free blog candy each month.  Until then, as my card says,  I'll be "Thinking of You"!  Thanks for all your support in the past.

A reminder that through the end of the month, the Sparkle Team presents Design Elements, Asian, Medallions and Andrea Roberts stamps on special - 15% off! To view all our specials, including stamps, glitters, EPs, and other fine SNS products, just click here.

HOW TO LEAVE A COMMENT: Are you new to blog hops? To find the comments section, scroll down to the bottom of this post. After the posted by Sandy, you will see the word COMMENTS.  Click on the word COMMENTS. A box will pop up (or you may have to scroll down again). Write your comment (sign your name if leaving an anonymous comment). Perhaps one of those wonky SPAM preventer options will show up. Just type in the shown characters and click enter. That’s all there is to it.  Hope this helps.

Many Thanks
Cheesy Sandy

Saturday, September 24, 2011

BLOG CANDY PRIZE WINNER and Another Penguin card

A huge thank you to all who participated in our Winter Blog Hop.  We all appreciate your time and the sincere comments you left for us. 

I promised a prize to one of the ladies who agreed to be a new follower of my blog.  Soooo, after writing all the names down and having my hubby pick a name from the hat...........drum roll........the winner of the brand new stampette set Hope Love Faith is....................Sandy (poochiegranny!!!!)


Sandy (poochiegranny), will you please email me (ilchezhead@yahoo.com) with your full name and address so that I can mail out your set.  Hope you enjoy creating with it.


The winners of the full Blog Hop are posted on the SNS blog today.  Here they are:
Grand Prize – Stamp Set of her Choice – Karen Ladd
Prize One from Barbara Bruder – 2 tinsel glitter colors of her choice! Margaret Tower (flamingo girl)
Prize Two from  marie Berquist – 3 embossing powders of her choice – Shartl (apedoaak)
Prize Three from Julie Zippel – 3 glitters of your choice – Aileen Freeman

Just because our customers are particularly awesome, and your comments were so sincere and kind, we have decided to have a SURPRISE PRIZE! One new Stampette Set of her choice awarded to Carrie (cardmakingqueen).

I thought that I would share another card I've created with the Playful Penguin set today.  It was really fun to make and I love making step cards.  You might be able to see it in person while visiting one of the stores that carry SNS products, or at the SNS shoppe in Ruskin, FL.

You can get the full directions for making this card here.

Thanks for dropping by today.  Hope to see you here again soon!
Sandy

Wednesday, September 21, 2011

Magical Winter Moments Blog Hop

Welcome to the Sparkle N Sprinkle Magical Winter Moments blog hop

Did you have arrive here from MARIE BERQUIST'S blog in our winter blog hop?  If you did not get here via Marie, perhaps you might want to go to the Sparkle and Sprinkle Blog to see all the participating sites and get the low down on the snowy trail.   

Yes, its that time again.....to begin planning for your holiday cards.  Can you believe it?  And the designers have been busy creating samples to help get those creative juices flowing.  Here in Wisconsin, it has been a bit chilly so I am starting to think SNOW (oh, and I am also starting to think that its time to head back to Florida...LOL).

My first inspiration came from the new Playful Penguin stamp set 438.
I used the Candy Cane Penguin because I thought that he would be cute for my grandsons' cards.  I took  designer paper with candy canes on it and used one of my new favorite techniques- - -applying embossing powder over the entire surface.  Simply rub the versamark pad directly to the entire surface and emboss with your favorite powder!  Here I used Sparkle embossing powder EP107.  I used two Sparkle and Soft colors for the penguin body.  Die cut a snowflake using the Grand Caliber, painted it silver and added glitter.  Used wonky rectangle die cuts and a candy cane charm colored with glitters.  Full directions can be found on the SNS website here.

The next card inspiration came from the Winter Swirl stamp set 414.
I have been wanting to make a tent topper card (see SNS tips and techniques section) and this reindeer was just asking to be on my card.  I started with the reindeer using Stickum Powder EP300 and Sparkling Sands Sparkle N Soft SS118. Doesn't the deer look soft? Next die cut using the Grand Caliber and a circle die, layer onto the lacey circle die cut from gold cardstock and finally place on olive mulberry paper.  Love mulberry paper!  The base card was stamped using the trees from this set in 2 colors, and then offset stamped using versamark and then embossed with Sparkle EP107.  You can view the full directions for this card here.

Hoping that you got some ideas from these cards.  Its time to slide over to the next talented designer's blog: KIM JAIME has more fun and inspiration for you to see here.

Don't forget to leave a comment below to be eligible for the blog hop prizes!  And thanks so much for stopping by.


Sandy (Cheesy)

P.S.  I will be giving away a special prize from me to you!  All you have to do is sign up during the blog hop to be one of my blog "followers".  Look on the far right side near the bottom where it says followers and sign up.  I will randomly choose one of my new followers to receive one of the new SNS stampette sets.  Good Luck.


Winter Arrives Tomorrow??

Yes, you read it correctly.  Winter arrives tomorrow.........the Magical Wintery Blog Hop sponsored by Sparkle and Sprinkle.  So, I thought I'd share a card I made last year for SNS and then I loved it so much that I used it for my own Christmas card.

The full directions for this card can be found here


Don't forget to come back tomorrow for lots and lots of great card ideas at the Sparkle and Sprinkle Blog Hop.  Start here.  

Hope to see you then.
Sandy

Monday, July 18, 2011

Busy Weekend Needs 4 Cards

A few weekends ago was really full!  I had intended to post this then, but life got in the way, so I'm just getting to post now.  Well, I attended a baby shower on Saturday for a good friend's daughter.  She is having a boy.  This card was done with a metal stencil (first pounce back of stencil with powder) then lay it on Sparkle and Sprinkle sticker paper.  Next carefully add holeless micro glass beads and rub into the open areas.  Carefully remove stencil and apply glitter to the rest of the sticky paper.  Finally its just a matter of adding the layers of colored paper for the finished A2 card.  The mom-to-be loved it.

[caption id="attachment_391" align="aligncenter" width="223" caption="Boy baby shower card"][/caption]

Then on Sunday we had the double celebration:  birthday party for our 3 year old grandson, Brian and a communion party for our 10 year old grandson, Diego.

The birthday card was e-a-s-y.  I used a piece of dp covered with Disney characters.  Cut them up into small squares, then put each onto glitter paper, then black paper and finally the purple metallic card base.  This was a perfect card since they had just gone to Disneyworld a month ago, and we gave him a share of Disney stock for his birthday.  Blogland isn't cooperating, so it wouldn't let me edit these pix ...sorry. Here's how the A2 card turned out:

[caption id="attachment_387" align="alignleft" width="176" caption="3rd Birthday Card for Brian"][/caption]

[caption id="attachment_503" align="aligncenter" width="150" caption="Inside"][/caption]

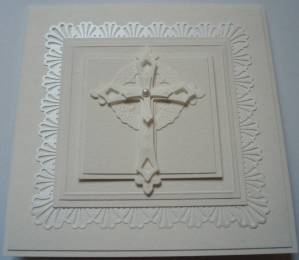
Deigo's communion card was figured out months ago....my dear friend, Paula, had told me about a card she was going to case and I knew it would be perfect.  It uses a Spellbinders die of  crosses that she had and I didn't, so she cut a bunch for me before I left Florida.  It also used another die as a frame that I didn't have, so I used a border punch........  Its all done in off whites and I love how it turned out.  Finished size is 5 1/2 X 5 1/2.  P.S. Diego thought it was awesome.


[caption id="attachment_398" align="aligncenter" width="300" caption="Communion Card"][/caption]

Lastly, my hubby's great niece graduated from pharmecutical school a few months ago but we were in Florida and missed the party.  We were going to see her at the party so I needed to have her card.  I used SNS stamp set 435-Graduation multiple times and colored it.  Lay SNS super adhesive paper over stamped image, remove paper cover and then cover with holeless clear glass beads.   Use a Spellbinders die to stamp the words onto.  Layer with gold and black paper to make an A2 card.  Full directions for this card will be on the Sparkle and Sprinkle web site in about a week.

[caption id="attachment_400" align="aligncenter" width="238" caption="Andrea's Grad Card"][/caption]

Hope that you found some ideas from these cards that you might use.  See you again soon.

Sandy (Cheesy)

Wednesday, July 13, 2011

SPARKLING WINTRY SENSATIONS BLOG HOP

Welcome to the Sparkle N Sprinkle "Sparkling Wintry Sensations” blog hop---do you like how I changed my header picture for the occasion?  If you arrived here by way of the Sparkle N Sprinkle Blog, then you're in the right place.  All of the rules and info for the hop and how to become eligible for SIX great prizes are back at the SNS blog, so I will not repeat it here.

On to the sparkly stuff!  Here is my design which uses the Winter Swirl stamp set #414:

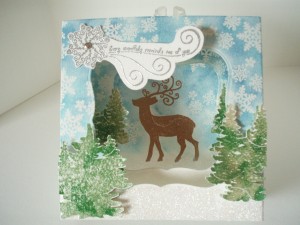
[caption id="attachment_440" align="aligncenter" width="300" caption="Winter Swirl Set 414 Diorama Card"][/caption]

When the blog theme was decided, all I could think of was what it looks like outside our windows (up here in Wisconsin) after a snowfall and I knew I wanted to make a diorama card (see the tips and techniques section at SNS for directions to make diorama cards.)  Diorama cards are great because you get all that dimension but it folds up flat, fits into a regular envie and usually doesn't take any extra postage.  The Winter Swirl stamp set has all the stamps needed for this card.   If you have the Grand Caliber die cut machine, you can diecut both pieces of cardstock at the same time--yippee.  Sparkling snow glitter is the perfect tool for snow and winter scenes (or just adding sparkle to any card).  This card does take extra time because of cutting out trees, and the extra layer but it is a wonderful gift for that special someone.  If you have never made a diorama card, I hope you've gotten the inspiration to try one. The directions for this card can be found here.

Oh and by the way, I might be one of "The FIVE" with a secondary prize, so don't forget to leave a comment below to become eligible for the Grand Prize and one of the 5 secondary prizes............then head on over to our Sensational Dawn's blog and continue on your sparkly, wintry way.

Stay cool and glad you came by!

[caption id="attachment_482" align="alignleft" width="120" caption="Winter in July?"][/caption]

Sandy

Tuesday, July 12, 2011

PRE-HOP CARDS for SNS Blog Hop

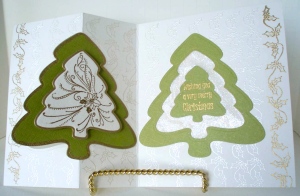
The Sparkle and Sprinkle design team is getting ready for our July Blog Hop which begins on Thursday, July 14.  You can visit the SNS Blog here to get the details.  In the meantime, here are some cards that I designed last year for SNS using their stamp set #420, Nestie Christmas Trees and the Spellbinders Christmas Tree die.

[caption id="attachment_418" align="aligncenter" width="300" caption="Flip Flop Tree Card"][/caption]


[caption id="attachment_420" align="alignleft" width="106" caption="More views of the flip flop card"][/caption]

Here are some other views of the same card so that you might get the idea of how it opens.  The directions to make this card are on the Sparkle N Sprinkle website here.

This is another card designed with the same stamp set and die which was an easel style card.

[caption id="attachment_425" align="aligncenter" width="247" caption="Nestie Christmas Tree-Easel card"][/caption]

You can see the directions for this easel card here.

Are you ready for more wintery inspirations???  Join the design team for all the fun (and prizes) starting Thursday when the Sparkling Winter Sensations Blog Hop begins (start the blog hop at the Sparkle N Sprinkle blog)!    Hope to see you then...


Sandy

Tuesday, May 10, 2011

"Not So Macho Masculine Card" Blog Hop

Welcome to the Sparkle N Sprinkle "Not So Macho Masculine Card" Blog Hop! You are in the right spot if you arrived here via the amazing Patti White's Blog.  If you'd like to start from the beginning and become eligible for great prizes, then click here (that's where you'll find all the directions you need to hop along). 

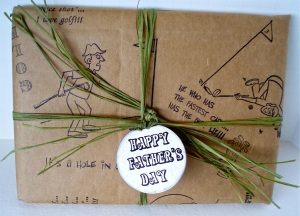
As I thought about what I'd like to do for this masculine blog hop and the golfers stamp sets I was using, I thought about my two sons and husband and how they would give their presents - - usually still in the bag they brought it home from the store in.  As the boys got older, we started using old newspapers and paper bags to "wrap" the gifts because it "looked my masculine".  Thus, my first creation:  brown paper bag gift wrap!!  LOL

[caption id="attachment_351" align="aligncenter" width="300" caption="Paper Bag Gift Wrap"][/caption]

It's really simple:  just cut open a brown paper bag and stamp to your heart's content.  Add some raffia "ribbon" and a tag.  To make the gift tag, simply fold a piece of glossy cardstock in half, place it in a Spellbinders circle die leaving the fold outside of the cutting circle.  The result should be a mini circle card.  Then stamp and emboss the words in black detail embossing powder on the front of the card/tag.  Run the front thru a die cut machine using the Cuttlebug Swiss Dots embossing folder 37-1604 (but put the paper in so the back is facing back--this will "de-boss" the image).  Viola!  A golf ball gift tag for the present.  Here's a close up to see it better.

[caption id="attachment_353" align="aligncenter" width="300" caption="'Golf Ball Gift Tag"][/caption]


Then I made a card to go along with it.  First die cut 4 small circles for golf balls and emboss the letters G,O,L and F from stamp #549-255MS on them before putting them thru the embossing folder.  (Hint:  ink stamp and then put scotch tape over the part you do not want to show).  Remove protective cover from 1/2 of sticker paper, lay ribbon and the golf balls onto sticker paper.  (Hint:  work on half of the sticker paper).  Apply Palm Green Flock (FL115).   Make a larger golf ball.  Stamp Father's Day #563-255B as above, remove paper from sticker paper.  Lay down golf ball and words, then apply flock.  Stamp Joe Cool #214-255G, colored him and cut him out.  Pop dot him on top of the golf ball.

[caption id="attachment_359" align="aligncenter" width="298" caption="Father's Day Golf Card"][/caption]

You can see the detailed directions for this card here.

I used two SNS sets for my projects:  Golf-McDuff #255 and Golf-Live Laugh Golf Set #192

We get to donate one product towards the grand prize! and I chose the Palm Green Flock (FL115) which was used on my card. I love to add texture to cards and flocking is a great way to do that. I am so excited to give you a sneak peek of this product as it is not yet for sale, so whoever wins will have this flock before anyone else!  Isn't that exciting?   

[caption id="attachment_342" align="alignleft" width="130" caption="Palm Green Flock FL115"][/caption]


Don't forget to leave a comment to become eligible for the prizes, then hop on over to Julie's blog to see her phenomenal creations.

Thanks for hop, hop, hopping by - - and I hope you enjoy the really amazing cards along the rest of the trail.

Sandy

Thursday, April 28, 2011

Zebra Cards


I seem to be way behind with my projects.   Having said that, I just finished sending in cards for Sparkle and Sprinkle and thought I'd share them with you.  I am using the stamp set Zebra #337 and came up with 3 different cards.


[caption id="attachment_306" align="aligncenter" width="233" caption="Card 1 - Cork Zebra"][/caption]

This card idea came from a lady on the stamping cruise (sorry, I cannot remember her name).  She had some awesome animal stamps and was trying to stamp them onto cork that she had.  When I got this stamp set from Sparkle and Sprinkle and saw the zebra, I knew I had to make a card using cork.  The card is pretty basic:  emboss the zebra using black detail embossing powder onto an adhesive cork sheet.  Then use the EK Success plaid edge punch #54-40089 for pieces of black cardstock glued all around the edges and a craft cardstock base.  I wanted to add more embellishments, but I think it looks good just as it is.


[caption id="attachment_305" align="aligncenter" width="236" caption="Card 2 - Split Negative Zebra"][/caption]

 The second card idea came from watching Gina K videos where she was doing split negative cards.  I took it one step further and did 4 pieces instead of just 2.  The basic idea is to stamp your design onto black paper and emboss with white embossing powder.  Then stamp the design again onto white paper and emboss with black embossing powder.  Cut the 2 images in half and place half of each one with the other.  Kind of like a mirror image.  I used "boa" yarn to edge the image and placed it onto green corregated paper then onto black cardstock to finish.  Its kind of an optical illusion card!


Card 3 - Its A Jungle Out There

The last card came about because I wanted to use up some "things" I had laying around for quite awhile.  I purchased some animal print card packs for $1 at Michael's a while ago and have wanted to use them..........and this was the perfect opportunity.  I cut them up to make a background.  Then I used Sparkle and Sprinkle's Dark Chocolate Flock and tear-ifiic tape to make a border on another piece of cardstock and taped the prints inside.   Used a spellbinders die to cut out the words, distressed it with some ink, punched out a paw print and layered onto more flocked paper.  Then I found a lion that I  had cut out at a store a couple years ago and he was purrr-fect for the card.  What do you think?              

Thanks for stopping by for a look......

Sandy