Pages

Showing posts with label Punches. Show all posts

Friday, February 1, 2019

Sadly a Sympathy Card

Sympathy cards are probably the hardest to create, because it is not something that we want to make.  A long time friend's spouse recently passed away and I am not able to attend the services.  I remembered creating a background with a Sparkle and Sprinkle stamp way back when I was on their design team, so I got the stamp out and made this card.


First stamp the image on gray CS six times with Versamark and emboss with Black Detail embossing powder.  Stamp them one at a time to make it easier to line them up.  Punch the edge with punch.  Layer onto black card base.  Die cut the bird two times, once in black and once in white.  Use Dimensional Glue over detail cut lines and apply Sparkling Snow glitter.  Pop the bird onto front.  Stamp the sentiment and emboss with Black Detail embossing powder.  Cut into a rectangle; layer onto black rectangle.

Inside

The inside only has the same punch along the edge and the sentiment stamped.  I really like this sentiment from Stampin Up.


Sympathy

Another card was needed for a different family member and I did not want to send the same card.  I punched the edge of the white card base, punched a piece of black CS and layered them. A piece of pattern paper was added to the top. Used the same bird die as above and a different SU sentiment.

Really hoping that you do not need a sympathy card but if you do, perhaps one of these will help.


Thank you for stopping by.
Sandy


Friday, November 2, 2012

Cards using Photographs

Taking pictures is something we all do, but not usually with cards in mind.  I did just that a couple weeks ago.  The fall colors were in full splendor and we had taken a trip up north to Door County Wisconsin.  I made my hubby stop numerous times so that I could get some pictures of the glorious colors.   I had a technique in mind that my dear sweet stampin' "seester", Shona,  developed while designing for Sparkle N Sprinkle.  You can go see her card and instructions on the Sparkle N Sprinkle page here.

I had a few birthdays in November and also needed a few thank you cards, so this is what I came up with.
Begin by taking a beautiful picture and then punch one edge using an edge punch.  Apply Tear-ific Tape (double sided tape) to the back of the punched area, turn it over and apply glitters or embossing powders to the top.  Burnish in to holes, brush off excess and finish card.

Edge punch with embossing powders

Here is the same picture that was printed in color and then again in black and white.  The black and white picture has some color added with copic markers, then the border punch was used and this time I used glitter instead of embossing powder.  I was going for a vintage/shabby look with the b + w picture by distressing the edges of the papers.  Below you can see the difference between the vintage/shabby look and the more polished look.  I apologize that the poor quality of card pictures doesn't show the b+w card very well.


The next card is simply one picture cut into 4 equal parts.  Then take a piece of paper that is slightly larger than the original picture and apply Tear-ific Tape around the outer edges, and down the center both vertically and horizonically.  Remove the protective cover and place the picture pieces down.  Now sprinkle on the sparkle n soft and rub into the tape to create borders around the picture pieces.  Finish card.

Sparkle N Soft

One last card using a photograph with a punched edge that was glittered.  This is a legal envelope sized card.
Thank you card using photograph

That's all for today.  Hope that you have gotten some ideas and will try them out.

I am entering this card into the following challenges:

ABC2-Halloween in a Hurry & Fast Fall Cards


Sandy (Cheesy)


Saturday, February 25, 2012

MORE SOOT STAMPING

Hi Stamping Friends,
Just got finished teaching the Smokin Hot Card Class using soot stamping techniques.  I have shown you two cards previously (see Feb. 19  post below) which were masculine cards done with soot and reverse soot stamping using the Sparkle N Sprinkle Stamp Set #285 - 1900 Cars.  So I thought I'd show you the other two cards we made. 

First is color soot stamping.  For this technique you first apply water based inks to the glossy cardstock and let dry.  Then proceed as usual with sooting and stamping.  Here is the card we did using this technique:
SNS Set #316  Elements
This is a tent topper card.  I used Petite Scallop Circle Large S4-115 to cut out the sooted image of Floral butterfly circle from Stamp Set #316.  This was the class' favorite card, even though many of them came to class specifically for the masculine car cards.  LOL.

Next, we did soot stamping onto precolored glossy cardstock.  Glossy cardstock comes in many different colors, but I chose a yellowish gold thinking it would show up better with the soot.

SNS Set #160 Butterflies
This is a gate fold card with a "belt" closure around the center.  We used one butterfly stamp from the Sparkle N Sprinkle Set #160 Butterflies.

So I hope this has given you some inspiration!  I am having company coming and going for the next 2.5 weeks, so not sure how often I will get to post.  I will try to get something up at least once a week, so check on back.  See you soon!

Thursday, February 23, 2012

Cupcakes for Birthdays

Don't you just love punches?  I know I do.  I recently added EK Success's Cupcake Chain Large Border Punch #54-50023 and wanted to use it.  on't you just love border


EK #54-50023
Cute, isn't it?  Since I have a number of neices and nephews, I decided to create a card that I could make several of and keep onhand.  Here's what I came up with:

3 Cupcake Birthday Cards
 I started by punching out the border in white cardstock, traced the bottom of the cutout along the front edge of the card and cut out.  Sponge a color of ink onto the cupcake wrapper and glue to the card.  Take some dimensional glue (I used Sparkle N Sprinkle #539) and then sprinkle on your desired outcome.  I used Sparkling Snow Glitter G1003 on the light pink card.  Since it is semi-transparent, some of the cardstock color shows thru.  On the dark blue card, I used Bridal Glitter G1029 which is opaque so the cs color doesn't come thru.  On the purple card, I used the Sparkling Snow, but added multi-colored holeless beads (they are really tiny) to make it look like sprinkles on the icing.  Since I made 7 cards, I really played around with different topping looks and I even did one that looked like chocolate frosting by adding Chocolate Sparkle EP127 embossing powder onto the glue (NO, you do not heat it.  Use it just like it was a glitter).  Sorry, but I already mailed that one out without taking a picture.

The words were from a piece of laser cut paper I bought at the local big box store.


I just cut out the words I wanted, coated with Versafine ink and embossed with different embossing powders.  Run it thru the Xyron machine and you have instant sticker words!  On the purple card, I used Dragon Fruit EP410 to emboss the words.  It has a kind of speckled appearance which went so nicely with the cupcake topping. LOL

Inside is some fun paper stamped with a cupcake that is colored with added "frosting" on top.  Each card has different papers inside. 

Think the kids will like them?  I hope so.  Try making one.....its not very hard.

Since I need a couple of cards that will go to some children that are a little older and live at the same house as those getting these cards, I am about to make a different cupcake card.  Stay tuned............

Have a great day today

Monday, February 20, 2012

Bleach - Its Not Just for Dirty Clothes

I have been playing around with different techniques that I had seen in years past.  This one is with bleach.  The idea is that you use bleach instead of ink to stamp your image.  I have seen some awesome cards done this way, but so far mine haven't been that good. 

First, you need to "create" a stamp pad with the bleach.  Take a container large enough to hold the stamp you will be using.  (I used a plastic container from Stampin Up stamps.)  Line it with paper towels or baby wipes and add some bleach.  You do not want too much bleach.....

Coyote Bleach Trials

Notice in the upper left corner, the image is not very defined.....too much bleach.  The lower left image has better definition.

Here is the simple get well card I made with one of the coyote bleach images:

Get Well "Oww-ch" Card
The next most important element is the paper.  All papers will act differently.  I tried about 10 different ones, and the coated ones (usually more expensive ones) did not work well.  I tried Core-dinations brand hoping that the second color would show thru, but it did not.  Really, the best paper to use from my experience is usually the thinner, cheaper paper.  Below you can see how different papers reacted.  The fun part is that you just never know what you will get!

Different Papers

Next element is the stamp.  You can see above that the more detailed stamps (Lottie Collage by Impression Obsession) can prove difficult to get the full image.  I did have success after a few tries, but it was harder.  I really like the blue one above.  It looks like a "negative" to me.  I haven't had time to make a card with it as yet.  When I do, I'll post it for you to see.

And finally.......some images that I was not at all happy with.  Just wanted to share the boo-boos too!

2 Giraffes-hard to see
2 Lions-blurry


I will be trying these images (both stamps by Beeswax) again when I have time.  I LOVE the images, just not sure that I love how they turned out with bleach!  LOL

Thanks for looking!
Sandy (Cheesy)

Saturday, February 4, 2012

Valentine Cards

Has it really been 2 months since my last post?  Where has the time gone?  Well, I plan to be posting again lots more often.

FEBRUARY!  And Valentine's Day is not far off.  I am busy making cards for the grandchildren.  These are explosion cards.  I think they turned out pretty cool.  Here's the first.  It has glitter paper punched with a Fiskars corner punch, some tissue paper (that I adhered to freezer paper) and a Sissix die.  The inside uses the Verses Rubber Stamp heart explosion template along with some stickers, Glimmer Mist and Spellbinders Scalloped Heart dies.  All four of the cards are basically the same, but the color combinations and a few changes make them look different.


Brian


Brian's inside


Next is Caleb's card and it is mostly the same.  Red and black color scheme but most of the same as before just in different places.


Caleb


Caleb's inside


Diego is a little older and I did the red and black again.


Diego


Diego's inside


Isabelle is the youngest and she got lots of pink and purple. 


Isabelle


Isabelle's inside


Try one of these explosion cards...they are not too hard.
Thanks for stopping by.  Hope to see you again soon!
Sandy (Cheesy)

Saturday, September 24, 2011

BLOG CANDY PRIZE WINNER and Another Penguin card

A huge thank you to all who participated in our Winter Blog Hop.  We all appreciate your time and the sincere comments you left for us. 

I promised a prize to one of the ladies who agreed to be a new follower of my blog.  Soooo, after writing all the names down and having my hubby pick a name from the hat...........drum roll........the winner of the brand new stampette set Hope Love Faith is....................Sandy (poochiegranny!!!!)


Sandy (poochiegranny), will you please email me (ilchezhead@yahoo.com) with your full name and address so that I can mail out your set.  Hope you enjoy creating with it.


The winners of the full Blog Hop are posted on the SNS blog today.  Here they are:
Grand Prize – Stamp Set of her Choice – Karen Ladd
Prize One from Barbara Bruder – 2 tinsel glitter colors of her choice! Margaret Tower (flamingo girl)
Prize Two from  marie Berquist – 3 embossing powders of her choice – Shartl (apedoaak)
Prize Three from Julie Zippel – 3 glitters of your choice – Aileen Freeman

Just because our customers are particularly awesome, and your comments were so sincere and kind, we have decided to have a SURPRISE PRIZE! One new Stampette Set of her choice awarded to Carrie (cardmakingqueen).

I thought that I would share another card I've created with the Playful Penguin set today.  It was really fun to make and I love making step cards.  You might be able to see it in person while visiting one of the stores that carry SNS products, or at the SNS shoppe in Ruskin, FL.

You can get the full directions for making this card here.

Thanks for dropping by today.  Hope to see you here again soon!
Sandy

Wednesday, February 23, 2011

Back from the Stamping Cruise

Hi!

Just got back a couple of days ago from the stamping cruise and we had a really fun time.  Met lots of new stampers, ate too much food and was really pooped when I got home on Saturday.  My two roomies were awesome - - and considering that 2 of us had never met one before, we got along famously.  Here we are in the cabin:


[caption id="attachment_275" align="alignleft" width="181" caption="Jill, Shona & Sandy (Cheesy)"][/caption]


[caption id="attachment_276" align="alignright" width="194" caption="Acting Silly"][/caption]


I taught 2 card classes and a make n take.  This card uses packing tape to adhere the glitter in the circle "windows", and it uses the new stamp set from Sparkle N Sprinkle called Cocktails II (all the cruising stampers got this  set):


[caption id="attachment_266" align="alignnone" width="216" caption="Hurrican Make N Take"][/caption]

Well, I'm really tired.  Taught 2 classes today at the store and was gone all day.  Will post pictures of the class cards tomorrow.

By the way, Sparkle N Sprinkle has an online bingo game going on now on their blog.  You can see all the details here.  It is lots of fun and there will be lots of prizes!!!

Good night all.

Sandy

Sunday, October 17, 2010

SNS Blog Hop

Sparkle and Sprinkle's Fall Blog Hop! 

Welcome and I'm happy you are visiting.

If you happened here by way of Julie Warner's blog, then you are in the right place.  However, if you arrived here from somewhere else, you might want to start from the beginning, at the SNS blog, so as not to miss anyone's remarkable cards!  At least one prize is involved, and the more visitors we have, the more prizes will be awarded - - - so tell your friends!  To become eleigible for a prize just:  Leave a comment at each designer's blog about her card AND who you think has the Hidden Birthday Prizes. 

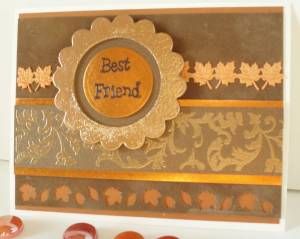
This is the card I've made for you.  It is a repurposed SNS stamp done in a fall theme.  I used the Brocade Backgrounds set to make a friend card.

Fall Inspiration using SNS stamp #3129-398H

The card base is burnt orange cardstock.  Next layer is brown suede paper that has leaves punched on the bottom.   Next is the beautiful swirl stamp embossed with Butterscotch EP 115 embossing powder which is mounted onto a copper metallic strip.
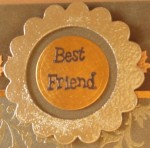
Close up of scallop circle
The scallop circle is a pre-cut piece of tagboard that was embossed using SNS Butterscotch embossing powder.  The words are SNS #187-354AA which are embossed with Teddy Brown EP187.  The piece was attached with pop dots.  I finished the card by adding cut leaf ribbon.  Does this card make you feel like autumn?


Thanks for visiting and I hope you've been inspired.  The next stop on the hop is the wonderfully talented Donna Ellis.  To visit her lovely creations, click Here.  But before you go..................................


Sunday, October 10, 2010

Autumn Sash Dress for SNS birthday

Happy Birthday to Sparkle N Sprinkle!  SNS is 13 years old- - -just think!  A teenager!!!  The design team was asked to create a fall themed birthday card while repurposing stamps we already owned.  Here is my creation.......
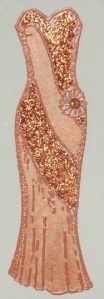
SNS Sash Dress in Autumn colors


[caption id="attachment_100" align="alignleft" width="104" caption="Close up of dress detail"][/caption]

This was a pretty simple card to do.  It is Sparkle and Sprinkle's stamp #1017-179G, heat emboss with Russet Embossing Powder #223, glittered with Orange Surprise #1010 and painted with Pearlescent water colors.  I used a Spellbinders die cut that I sponged with Spiced Marmalade distress ink.  It is layered on Stardream flame cardstock, then a patterned velum with a 1 1/2" ribbon on the side that has a leaf punch on top.  Finished with a corner punch and the Happy Birthday #1237-234A embossed again with Russet.  I think it could be used for lots of different ocassions.  Thanks for stopping by...

Tuesday, September 7, 2010

Grandson Caleb's Birthday Card

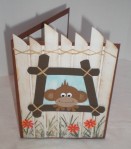
This is a card that I cased on the internet and loved the look since my 1 year old grandson's bedroom has a jungle animal theme.  It wasn't too hard to make and I only used 2 stamps (flowers and grass).  The monkey is done with punches.  I think his mom and dad liked it.  Caleb tried to eat it LOL.  Loved making this card.