Pages

Showing posts with label Embossing Powder. Show all posts

Friday, February 1, 2019

Sadly a Sympathy Card

Sympathy cards are probably the hardest to create, because it is not something that we want to make.  A long time friend's spouse recently passed away and I am not able to attend the services.  I remembered creating a background with a Sparkle and Sprinkle stamp way back when I was on their design team, so I got the stamp out and made this card.


First stamp the image on gray CS six times with Versamark and emboss with Black Detail embossing powder.  Stamp them one at a time to make it easier to line them up.  Punch the edge with punch.  Layer onto black card base.  Die cut the bird two times, once in black and once in white.  Use Dimensional Glue over detail cut lines and apply Sparkling Snow glitter.  Pop the bird onto front.  Stamp the sentiment and emboss with Black Detail embossing powder.  Cut into a rectangle; layer onto black rectangle.

Inside

The inside only has the same punch along the edge and the sentiment stamped.  I really like this sentiment from Stampin Up.


Sympathy

Another card was needed for a different family member and I did not want to send the same card.  I punched the edge of the white card base, punched a piece of black CS and layered them. A piece of pattern paper was added to the top. Used the same bird die as above and a different SU sentiment.

Really hoping that you do not need a sympathy card but if you do, perhaps one of these will help.


Thank you for stopping by.
Sandy


Friday, November 2, 2012

Cards using Photographs

Taking pictures is something we all do, but not usually with cards in mind.  I did just that a couple weeks ago.  The fall colors were in full splendor and we had taken a trip up north to Door County Wisconsin.  I made my hubby stop numerous times so that I could get some pictures of the glorious colors.   I had a technique in mind that my dear sweet stampin' "seester", Shona,  developed while designing for Sparkle N Sprinkle.  You can go see her card and instructions on the Sparkle N Sprinkle page here.

I had a few birthdays in November and also needed a few thank you cards, so this is what I came up with.
Begin by taking a beautiful picture and then punch one edge using an edge punch.  Apply Tear-ific Tape (double sided tape) to the back of the punched area, turn it over and apply glitters or embossing powders to the top.  Burnish in to holes, brush off excess and finish card.

Edge punch with embossing powders

Here is the same picture that was printed in color and then again in black and white.  The black and white picture has some color added with copic markers, then the border punch was used and this time I used glitter instead of embossing powder.  I was going for a vintage/shabby look with the b + w picture by distressing the edges of the papers.  Below you can see the difference between the vintage/shabby look and the more polished look.  I apologize that the poor quality of card pictures doesn't show the b+w card very well.


The next card is simply one picture cut into 4 equal parts.  Then take a piece of paper that is slightly larger than the original picture and apply Tear-ific Tape around the outer edges, and down the center both vertically and horizonically.  Remove the protective cover and place the picture pieces down.  Now sprinkle on the sparkle n soft and rub into the tape to create borders around the picture pieces.  Finish card.

Sparkle N Soft

One last card using a photograph with a punched edge that was glittered.  This is a legal envelope sized card.
Thank you card using photograph

That's all for today.  Hope that you have gotten some ideas and will try them out.

I am entering this card into the following challenges:

ABC2-Halloween in a Hurry & Fast Fall Cards


Sandy (Cheesy)


Monday, May 7, 2012

Embossing X 2 Class

Wednesday, May 9th (10:30 am - 1:30 pm) at Scraporium is the next class.  I am calling it "Embossing X 2", since we will be using Embossing Folders and Embossing Powders.  One of the cards is definitely masculine and the music themed one could also be for a guy.  If you aren't loving some of the sayings I used, I usually bring one or two others......but you could always leave that part blank and add words when you need it.  These are really versatile cards.  Call Denise at the store (813) 269-7946 to sign up.


Sandy (Cheesy)

Thursday, February 23, 2012

Cupcakes for Birthdays

Don't you just love punches?  I know I do.  I recently added EK Success's Cupcake Chain Large Border Punch #54-50023 and wanted to use it.  on't you just love border


EK #54-50023
Cute, isn't it?  Since I have a number of neices and nephews, I decided to create a card that I could make several of and keep onhand.  Here's what I came up with:

3 Cupcake Birthday Cards
 I started by punching out the border in white cardstock, traced the bottom of the cutout along the front edge of the card and cut out.  Sponge a color of ink onto the cupcake wrapper and glue to the card.  Take some dimensional glue (I used Sparkle N Sprinkle #539) and then sprinkle on your desired outcome.  I used Sparkling Snow Glitter G1003 on the light pink card.  Since it is semi-transparent, some of the cardstock color shows thru.  On the dark blue card, I used Bridal Glitter G1029 which is opaque so the cs color doesn't come thru.  On the purple card, I used the Sparkling Snow, but added multi-colored holeless beads (they are really tiny) to make it look like sprinkles on the icing.  Since I made 7 cards, I really played around with different topping looks and I even did one that looked like chocolate frosting by adding Chocolate Sparkle EP127 embossing powder onto the glue (NO, you do not heat it.  Use it just like it was a glitter).  Sorry, but I already mailed that one out without taking a picture.

The words were from a piece of laser cut paper I bought at the local big box store.


I just cut out the words I wanted, coated with Versafine ink and embossed with different embossing powders.  Run it thru the Xyron machine and you have instant sticker words!  On the purple card, I used Dragon Fruit EP410 to emboss the words.  It has a kind of speckled appearance which went so nicely with the cupcake topping. LOL

Inside is some fun paper stamped with a cupcake that is colored with added "frosting" on top.  Each card has different papers inside. 

Think the kids will like them?  I hope so.  Try making one.....its not very hard.

Since I need a couple of cards that will go to some children that are a little older and live at the same house as those getting these cards, I am about to make a different cupcake card.  Stay tuned............

Have a great day today

Monday, November 28, 2011

A Birthday Card on the Masculine Side

Hello everyone,
Its been awhile and I am sure you have been as busy as I have.  Now that Thanksgiving is over, all we have to look forward to is the Christmas rush.  LOL. 

Well, I had a birthday card to make for my son who just came into town from Canada.  We were lucky enough to see him and his family for a few days this weekend.  What fun!  So I am sharing the card I made for him.  Its not that complicated, as I didn't have lots of time to fuss.  But then guy cards always seem to be more simple.  At least to me.

The card was made with black and gold cardstock.  The main design was done with a cuttlebug embossing folder and then I ran black ink over the top to pop out the design.  I cut out the saying with a Spellbinders tag die and heat embossed the saying with black embossing powder.  Added a ribbon and it was done.  I liked the look of it and so did he.  Simple yet elegant.

I am entering this card into the following challenges
    More Than Favors-Wacky Wednesday #60-Birthday Theme
    Speedy the Cat's Friends Challenge #83-Make It Masculine
    Rainbow Lady's Challenge #180-Cards for Men
    Here Come the Boys Challenge #19-For the Man/Men In Your Life
    Whimsical Designs Wednesday Challenge - Add Texture

Happy Stamping,
Sandy (Cheesy)

Monday, November 14, 2011

Water Lily Birthday Card for a Challenge

I have been wanting to try some challenges from other sites for quite awhile, but usually have been too busy to even think about it.  So here is my first attempt.  This is a card that uses glitter and a beautiful cardstock to get lots of Bling! 

Water Lily Birthday Card


All stamps, glitters and embossing powders by Sparkle and Sprinkle.  Start by stamping the Water Lily 1236-234M and emboss using Silver Detail Embossing Powder EP257, then color with copic markers.  Use versamarker on the flowers then apply Sparkle Embossing Powder EP107.  Stamp Happy Birthday 1237-234A in blue ink (cover the "to you" with tape).  Next cut out the image using Spellbinders Labels Four Die S4-190 (largest), leave the die on the paper and shade with pink ink.  Add Silver Leaf Tinsel Glitter GT3004 with glue to the center of the one flower.  Use the same die and trace around the outside and cut out of turquoise paper.  Die cut the Sissix Corner Flower #2 die from Sticker paper. Remove backing and sprinkle Bubblegum Glitter G1088 over. Attach to corner as in picture
Die cut the bottom butterfly from white cardstock and the top butterfly from vellum. Leave the paper in the die and color the spots with pink Copic marker on the white paper, and use Gelly Roll Pink Star pen of the vellum. Use a Sakura glue pen on the spots on the white paper, then sprinkle with Sparkling Snow
glitter G1003. On the vellum, brush the entire butterfly with brushable glue, sprinkle on Sparkling Snow glitter. **the paper will curl—after dry bend it back into shape. When dry, attach vellum butterfly layer onto white layer using 1/8” Tear-ific Tape.
The pretty blue background was made using Cadillac Embossed Cover that you can buy here.  It is beautiful all by itself in white, but I simply added some blue dye inks with daubers until I got the color I wanted.  Simple and shiny.

I am entering this into the following challenge:
Party Time Tuesdays #41, bling it on:  http://partytimetuesdays.blogspot.com/2011/11/ptt41-bling-it-on-anything-sparkly.html

Thank you as always for stopping by to visit.
Sandy (Cheesy)

Thursday, November 10, 2011

It's A Cultural Thing Blog Hop presented by Sparkle and Sprinkle

Welcome!  Yokoso!  Bienvenidos!  DzieÅ„ dobry!  Benvenuti!  Welkom!  Karibu!  Välkommen!...........

We at SNS are celebrating America’s richness of customs and culture in a blog hop!  If you happened here by chance, and not from the blog of the talented Patti White, then you might want to go over to the Sparkle and Sprinkle Blog to start from the beginning and get all the details about what to do and how to be eligible for all the wonderful prizes.  Otherwise, let's continue our journey..........  

Remember in school we learned that America is the "melting pot"?  And that is so true!  We all know our ethnic backgrounds and hopefully cherish their traditions.  When my family moved to a neighborhood that had many Jewish residents, we all learned of that rich faith and their traditions.  My eldest's son's best friend in grammar school was a blend of Irish and Japanese.  I chose a stamp set with his family in mind:  Asian-Umbrella Geisha #300.  Here is the card:

Umbrella Geisha

I decided to make a center step card (finished size of this one is 5.5 X 5.5).  Red and black and gold seemed to say Asian to me.  Stamped the willow branch in versamark and embossed with clear embossing powder for a background, then embossed the Geisha in black detail embossing powder and cut out.  Added a beautiful cord/ribbon in black.  It needed a little detail, so I made the little square Japanese symbols for the bottom corners.  You can go here to see the complete directions to make this card.

After you leave a comment here to be eligible for prizes, stroll on over to Dawn's fabulous blog to continue on your journey around the world with us.  Winners will be announced Saturday, November 12 between 11AM-3PM (Pacific Time) on the SNS blog.

By the way, this is my last blog hop with the Sparkle team, as I will no longer be a full time designer.  I will, however, be a guest designer on ocassion.  Please stop by to see what is going on in my part of the world when you can.  I am planning to give away some free blog candy each month.  Until then, as my card says,  I'll be "Thinking of You"!  Thanks for all your support in the past.

A reminder that through the end of the month, the Sparkle Team presents Design Elements, Asian, Medallions and Andrea Roberts stamps on special - 15% off! To view all our specials, including stamps, glitters, EPs, and other fine SNS products, just click here.

HOW TO LEAVE A COMMENT: Are you new to blog hops? To find the comments section, scroll down to the bottom of this post. After the posted by Sandy, you will see the word COMMENTS.  Click on the word COMMENTS. A box will pop up (or you may have to scroll down again). Write your comment (sign your name if leaving an anonymous comment). Perhaps one of those wonky SPAM preventer options will show up. Just type in the shown characters and click enter. That’s all there is to it.  Hope this helps.

Many Thanks
Cheesy Sandy

Wednesday, October 26, 2011

More Quick Halloween Cards

As promised yesterday, I finished the other 3 cards for my grandchildren.  I really like how they turned out and hope you get some ideas.

Here is a ghost and a skeleton.  Just changing the cardstock color and inked background color gives a whole different look.  The ink inside the frame was sponged on to look smokey or hazy.


And lastly is the darling little witch for my only granddaughter.  I used purples for this card since the witch came that way. 

Here is one of the card's inside, which has the same embossing folder except with a gray ink rubbed onto it.  Stamp saying and color with marker.


Check out your stash - - - you probably have STUFF that could be added to your cards.  I had lots of stickers as you can see above.  Some glittery gel pens added a little pizzaz.  I'm going to make a few similar cards using up more stickers some neices and a nephew. 
Have Fun!
Cheesy Sandy

Tuesday, October 25, 2011

NO Stamping Halloween Card for Grandkiddies

Late as usual, but I am finally getting to the Halloween cards for my 4 grandchildren.  I started them a few weeks ago, but got caught up in other things so I am just getting around to working on them again.
I started with a Darice Spider Web embossing folder (1216-73) on cream cardstock.  Then add versamark ink direct to paper around the edges (where the embossing is), then heat emboss with black embossing powder.  It makes the image look old and worn.  I added some distress ink into the center of the frame (this one got a red), and then I used K&Company dimentional stickers of costumed children to put inside my "frame". A couple more stickers of spiders and voila! Its done.  I did another embossed frame for the inside and added a sentiment.  I love how this one turned out and I think my kiddos will too.  What do you think?

2011 Halloween

I will be doing a few more tonight and will upload as soon as I can.  They are really very quick and simple....and I needed that this year!  LOL
Come back to visit again soon.  I am planning to post more often.  Promise.
Sandy (Cheesy)

Wednesday, September 21, 2011

Magical Winter Moments Blog Hop

Welcome to the Sparkle N Sprinkle Magical Winter Moments blog hop

Did you have arrive here from MARIE BERQUIST'S blog in our winter blog hop?  If you did not get here via Marie, perhaps you might want to go to the Sparkle and Sprinkle Blog to see all the participating sites and get the low down on the snowy trail.   

Yes, its that time again.....to begin planning for your holiday cards.  Can you believe it?  And the designers have been busy creating samples to help get those creative juices flowing.  Here in Wisconsin, it has been a bit chilly so I am starting to think SNOW (oh, and I am also starting to think that its time to head back to Florida...LOL).

My first inspiration came from the new Playful Penguin stamp set 438.
I used the Candy Cane Penguin because I thought that he would be cute for my grandsons' cards.  I took  designer paper with candy canes on it and used one of my new favorite techniques- - -applying embossing powder over the entire surface.  Simply rub the versamark pad directly to the entire surface and emboss with your favorite powder!  Here I used Sparkle embossing powder EP107.  I used two Sparkle and Soft colors for the penguin body.  Die cut a snowflake using the Grand Caliber, painted it silver and added glitter.  Used wonky rectangle die cuts and a candy cane charm colored with glitters.  Full directions can be found on the SNS website here.

The next card inspiration came from the Winter Swirl stamp set 414.
I have been wanting to make a tent topper card (see SNS tips and techniques section) and this reindeer was just asking to be on my card.  I started with the reindeer using Stickum Powder EP300 and Sparkling Sands Sparkle N Soft SS118. Doesn't the deer look soft? Next die cut using the Grand Caliber and a circle die, layer onto the lacey circle die cut from gold cardstock and finally place on olive mulberry paper.  Love mulberry paper!  The base card was stamped using the trees from this set in 2 colors, and then offset stamped using versamark and then embossed with Sparkle EP107.  You can view the full directions for this card here.

Hoping that you got some ideas from these cards.  Its time to slide over to the next talented designer's blog: KIM JAIME has more fun and inspiration for you to see here.

Don't forget to leave a comment below to be eligible for the blog hop prizes!  And thanks so much for stopping by.


Sandy (Cheesy)

P.S.  I will be giving away a special prize from me to you!  All you have to do is sign up during the blog hop to be one of my blog "followers".  Look on the far right side near the bottom where it says followers and sign up.  I will randomly choose one of my new followers to receive one of the new SNS stampette sets.  Good Luck.


Wednesday, July 13, 2011

SPARKLING WINTRY SENSATIONS BLOG HOP

Welcome to the Sparkle N Sprinkle "Sparkling Wintry Sensations” blog hop---do you like how I changed my header picture for the occasion?  If you arrived here by way of the Sparkle N Sprinkle Blog, then you're in the right place.  All of the rules and info for the hop and how to become eligible for SIX great prizes are back at the SNS blog, so I will not repeat it here.

On to the sparkly stuff!  Here is my design which uses the Winter Swirl stamp set #414:

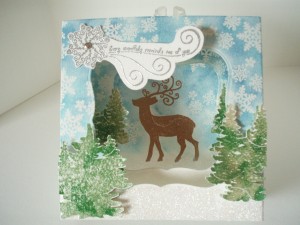
[caption id="attachment_440" align="aligncenter" width="300" caption="Winter Swirl Set 414 Diorama Card"][/caption]

When the blog theme was decided, all I could think of was what it looks like outside our windows (up here in Wisconsin) after a snowfall and I knew I wanted to make a diorama card (see the tips and techniques section at SNS for directions to make diorama cards.)  Diorama cards are great because you get all that dimension but it folds up flat, fits into a regular envie and usually doesn't take any extra postage.  The Winter Swirl stamp set has all the stamps needed for this card.   If you have the Grand Caliber die cut machine, you can diecut both pieces of cardstock at the same time--yippee.  Sparkling snow glitter is the perfect tool for snow and winter scenes (or just adding sparkle to any card).  This card does take extra time because of cutting out trees, and the extra layer but it is a wonderful gift for that special someone.  If you have never made a diorama card, I hope you've gotten the inspiration to try one. The directions for this card can be found here.

Oh and by the way, I might be one of "The FIVE" with a secondary prize, so don't forget to leave a comment below to become eligible for the Grand Prize and one of the 5 secondary prizes............then head on over to our Sensational Dawn's blog and continue on your sparkly, wintry way.

Stay cool and glad you came by!

[caption id="attachment_482" align="alignleft" width="120" caption="Winter in July?"][/caption]

Sandy

Tuesday, July 12, 2011

PRE-HOP CARDS for SNS Blog Hop

The Sparkle and Sprinkle design team is getting ready for our July Blog Hop which begins on Thursday, July 14.  You can visit the SNS Blog here to get the details.  In the meantime, here are some cards that I designed last year for SNS using their stamp set #420, Nestie Christmas Trees and the Spellbinders Christmas Tree die.

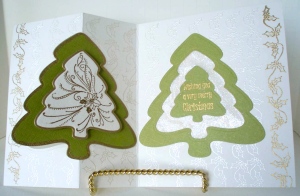
[caption id="attachment_418" align="aligncenter" width="300" caption="Flip Flop Tree Card"][/caption]


[caption id="attachment_420" align="alignleft" width="106" caption="More views of the flip flop card"][/caption]

Here are some other views of the same card so that you might get the idea of how it opens.  The directions to make this card are on the Sparkle N Sprinkle website here.

This is another card designed with the same stamp set and die which was an easel style card.

[caption id="attachment_425" align="aligncenter" width="247" caption="Nestie Christmas Tree-Easel card"][/caption]

You can see the directions for this easel card here.

Are you ready for more wintery inspirations???  Join the design team for all the fun (and prizes) starting Thursday when the Sparkling Winter Sensations Blog Hop begins (start the blog hop at the Sparkle N Sprinkle blog)!    Hope to see you then...


Sandy

Tuesday, May 10, 2011

"Not So Macho Masculine Card" Blog Hop

Welcome to the Sparkle N Sprinkle "Not So Macho Masculine Card" Blog Hop! You are in the right spot if you arrived here via the amazing Patti White's Blog.  If you'd like to start from the beginning and become eligible for great prizes, then click here (that's where you'll find all the directions you need to hop along). 

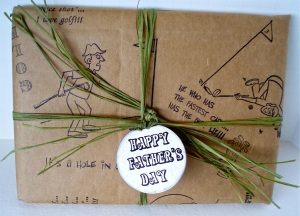
As I thought about what I'd like to do for this masculine blog hop and the golfers stamp sets I was using, I thought about my two sons and husband and how they would give their presents - - usually still in the bag they brought it home from the store in.  As the boys got older, we started using old newspapers and paper bags to "wrap" the gifts because it "looked my masculine".  Thus, my first creation:  brown paper bag gift wrap!!  LOL

[caption id="attachment_351" align="aligncenter" width="300" caption="Paper Bag Gift Wrap"][/caption]

It's really simple:  just cut open a brown paper bag and stamp to your heart's content.  Add some raffia "ribbon" and a tag.  To make the gift tag, simply fold a piece of glossy cardstock in half, place it in a Spellbinders circle die leaving the fold outside of the cutting circle.  The result should be a mini circle card.  Then stamp and emboss the words in black detail embossing powder on the front of the card/tag.  Run the front thru a die cut machine using the Cuttlebug Swiss Dots embossing folder 37-1604 (but put the paper in so the back is facing back--this will "de-boss" the image).  Viola!  A golf ball gift tag for the present.  Here's a close up to see it better.

[caption id="attachment_353" align="aligncenter" width="300" caption="'Golf Ball Gift Tag"][/caption]


Then I made a card to go along with it.  First die cut 4 small circles for golf balls and emboss the letters G,O,L and F from stamp #549-255MS on them before putting them thru the embossing folder.  (Hint:  ink stamp and then put scotch tape over the part you do not want to show).  Remove protective cover from 1/2 of sticker paper, lay ribbon and the golf balls onto sticker paper.  (Hint:  work on half of the sticker paper).  Apply Palm Green Flock (FL115).   Make a larger golf ball.  Stamp Father's Day #563-255B as above, remove paper from sticker paper.  Lay down golf ball and words, then apply flock.  Stamp Joe Cool #214-255G, colored him and cut him out.  Pop dot him on top of the golf ball.

[caption id="attachment_359" align="aligncenter" width="298" caption="Father's Day Golf Card"][/caption]

You can see the detailed directions for this card here.

I used two SNS sets for my projects:  Golf-McDuff #255 and Golf-Live Laugh Golf Set #192

We get to donate one product towards the grand prize! and I chose the Palm Green Flock (FL115) which was used on my card. I love to add texture to cards and flocking is a great way to do that. I am so excited to give you a sneak peek of this product as it is not yet for sale, so whoever wins will have this flock before anyone else!  Isn't that exciting?   

[caption id="attachment_342" align="alignleft" width="130" caption="Palm Green Flock FL115"][/caption]


Don't forget to leave a comment to become eligible for the prizes, then hop on over to Julie's blog to see her phenomenal creations.

Thanks for hop, hop, hopping by - - and I hope you enjoy the really amazing cards along the rest of the trail.

Sandy

Wednesday, March 2, 2011

Glittery Stained Glass Class at SNS Shoppe

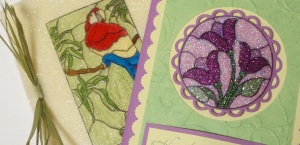
Just a quick note to let you know that I'll be doing a class on Wednesday, March 16th.  We will be doing 3 glitter-ific stained glass cards, so be prepared to use lots and lots of glitter.....oh and some glue and acetate as well.   The cards will be great to use for Easter, Mother's Day, Birthdays or whatever you can think of.

[caption id="attachment_291" align="aligncenter" width="300" caption="2 glittered stained glass cards"][/caption]

The glitter isn't showing up as much in the pictures as in real life.

Class times are 10 am - 12:30 pm; 1:30 pm- 4 pm; and 6 pm - 8:30 pm.

Place:  Sparkle N Sprinkle Shoppe, 2701 College Ave. E, Ste #7, Ruskin FL.  Maybe I'll see you there.

Its late, so that's all for now..........

Thanks for stopping by

Sandy

Sunday, October 10, 2010

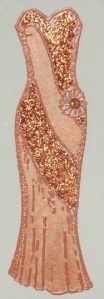
Autumn Sash Dress for SNS birthday

Happy Birthday to Sparkle N Sprinkle!  SNS is 13 years old- - -just think!  A teenager!!!  The design team was asked to create a fall themed birthday card while repurposing stamps we already owned.  Here is my creation.......
SNS Sash Dress in Autumn colors


[caption id="attachment_100" align="alignleft" width="104" caption="Close up of dress detail"][/caption]

This was a pretty simple card to do.  It is Sparkle and Sprinkle's stamp #1017-179G, heat emboss with Russet Embossing Powder #223, glittered with Orange Surprise #1010 and painted with Pearlescent water colors.  I used a Spellbinders die cut that I sponged with Spiced Marmalade distress ink.  It is layered on Stardream flame cardstock, then a patterned velum with a 1 1/2" ribbon on the side that has a leaf punch on top.  Finished with a corner punch and the Happy Birthday #1237-234A embossed again with Russet.  I think it could be used for lots of different ocassions.  Thanks for stopping by...

Tuesday, September 14, 2010

Spinner Card

Have you ever done a spinner card?


I suppose there are lots of types of spinner cards out there.  This is one version.

we're not sure what this is, so this is a test.I made this for Sparkle and Sprinkle for their card set #402.  I love this set and wanted the shell to spin around much like it might if it was washing up to shore in the water.  I also used some dimensional glue on the shell to make it look 3-D.  Hope you like it.

Enlargement of spinner circle
.

.

.

Here is a close up of the spinning shell in the cut out window.